This article is supplied by Microsoft. The original can be seen here.
These steps describe how to set up your email account using Outlook 2013 or Outlook 2010 on your PC.
Got a Mac? See Set up email in Outlook for Mac or Set up email in Outlook for Mac 2011.
If you want to set up Outlook with an account that uses POP3 or IMAP4, see Add an email account with custom settings or when automatic setup doesn’t work.
Set up your work or school email account in Outlook using the Auto Account Wizard
Note If you’re using Outlook 2010 with Office 365 for business, you need to set up your desktop before you can set up Outlook to access your account. See Set up Office 2010 desktop programs to work with Office 365 for business.
Using the Auto Account Wizard is the quickest way to set up your account in Outlook 2013 or Outlook 2010.
- Open Outlook 2013 or Outlook 2010. When the Auto Account Wizard opens, select Next. On the E-mail Accounts page, select Next.
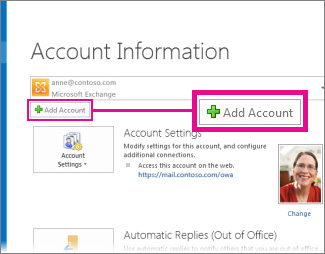
If the Wizard didn't open or you want to add an additional email account, on the Outlook toolbar select the File tab.

- Select Add Account.

- On the Auto Account Setup page, enter your name, e-mail address, and password, and then select Next.
- Select Finish.
My account didn't set up
If your account didn't automatically set up, Outlook may ask you to try again using an unencrypted connection to the mail server. If that doesn't work, you can use the manual setup option. See Add an email account with custom settings or when automatic setup doesn’t work.
Applies To: Office 365 End User, Outlook 2010, Office 365 Admin, Outlook Web App for Office 365 Small Business, Outlook Web App, Office 365 Small Business Admin, Outlook Web App for Office 365, Outlook 2013, Outlook 2013, Outlook 2016.